The Yamaha MG12XU is a 12-channel mixer with 24-bit digital processing and a 192 kHz sample rate, offering high-quality sound reproduction. It features USB connectivity, built-in effects, and durable construction.
Overview
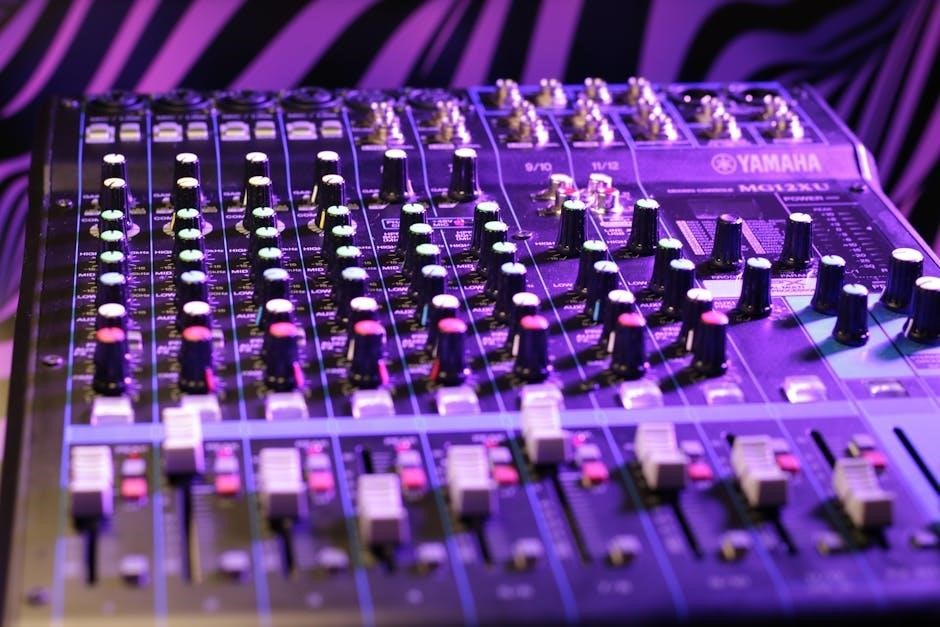
The Yamaha MG12XU is a versatile 12-channel mixer designed for both live sound and studio applications. Built with a robust steel chassis, it offers 24-bit digital processing and a 192 kHz sample rate, ensuring high-quality audio reproduction. The mixer features USB connectivity for easy recording and playback, along with built-in digital effects for enhancing sound. Its compact design and intuitive interface make it ideal for professionals and beginners alike. With durable construction and flexible connectivity options, the MG12XU is a reliable choice for a wide range of audio mixing needs, delivering clarity and precision in every performance.
Key Features
The Yamaha MG12XU boasts 12 input channels with 4 dedicated microphone inputs, featuring D-PRE preamps for clear audio capture. It includes 24-bit digital effects with SPX processing and USB connectivity for direct computer recording. The mixer offers 3-band EQ on all channels and a high-resolution LCD display for precise control. Its compact, durable design ensures reliability in both live and studio environments. Additional features include XLR and RCA connectors, 6.3mm headphone output, and two monitor outputs for flexible audio routing. These features make the MG12XU a powerful and versatile tool for achieving professional-grade sound reproduction and mixing.

Setting Up the Mixer
Connect microphones and instruments to the MG12XU’s inputs, install drivers, and configure software settings for optimal performance. Refer to the manual for detailed setup guidelines.
Physical Installation
Mount the MG12XU securely, ensuring proper ventilation. Connect microphones to XLR inputs and instruments to TRS inputs. Use RCA connectors for line-level sources. Attach headphones via the 6.3mm jack. Connect monitor speakers to the dedicated outputs. Install the rack-mount kit for secure installation. Ensure all cables are tightly secured. Place the mixer on a stable surface, away from direct sunlight and moisture. Connect power using the provided AC cord. Refer to the manual for specific port configurations and cable management tips. Proper physical setup ensures reliable performance and prevents damage to the mixer and connected equipment.
Software Configuration
Connect the MG12XU to your computer via USB to enable recording and playback. Install the Yamaha Steinberg USB driver for compatibility with your DAW. Open your digital audio workstation (DAW) and select the MG12XU as the audio interface. Configure input and output settings to match your setup. Use the mixer’s digital effects and routing options within the software. Ensure the firmware is up-to-date for optimal performance. Refer to the manual for specific software settings and troubleshooting tips. Proper software configuration ensures seamless integration with your computer and recording system, enhancing your audio production experience.

Operating the Mixer
Operate the Yamaha MG12XU by adjusting channel levels with faders, using the master volume for overall control, and employing EQ and effects for sound shaping. Use the USB interface for recording and monitor via headphones.
Basic Controls
The Yamaha MG12XU features intuitive controls, including channel faders for volume adjustment and GAIN knobs for input level optimization. The MASTER fader regulates overall output, while the STEREO OUT controls manage the final mix. Users can monitor audio via the PHONES jack, with level adjustment using the PHONE VOL knob. EQ knobs (HIGH, MID, LOW) enable tone shaping, and the EFFECT button provides access to built-in effects. LED level meters ensure precise monitoring, while the USB TO STEREO switch routes USB audio to the main mix. These controls streamline workflow for both live and recording applications, ensuring professional-quality sound management.
Advanced Functions
The Yamaha MG12XU offers advanced features like built-in digital effects, including reverb, delay, and chorus, selectable via the EFFECT button and adjustable with dedicated knobs. The USB interface enables direct recording to a computer, supporting 24-bit/192kHz resolution. Pre-Fader Listen (PFL) allows isolating channels for precise monitoring. Auxiliary sends provide flexibility for external processors or monitor mixes. The mixer also includes a stereo imaging enhancer for widening the soundstage and a mute function for channels. These features enhance creativity and precision, making the MG12XU ideal for professional audio applications, from live performances to studio recordings.

Troubleshooting Common Issues
Common issues include PFL lights staying on, no sound from monitors, and static. Solutions involve checking connections, adjusting levels, and ensuring proper setup as per the manual.
Identifying Problems
Common issues with the Yamaha MG12XU include the PFL indicator staying on, no sound from monitors, and static. Users may also experience unexpected behavior like lights flashing or sound dropouts. To identify problems, check connections, ensure proper gain staging, and verify that all channels are correctly routed. If the PFL light remains on, ensure no Pre-fader Listen switches are active. For no sound, verify that outputs are correctly configured and volume levels are adequate. Static may indicate faulty cables or improper grounding. Refer to the manual for detailed troubleshooting steps to resolve these issues effectively.
Effective Solutions
For common issues like the PFL light staying on, deactivate all Pre-fader Listen switches and ensure no channels are active. If no sound from monitors, check output configurations and ensure monitor outputs are connected. For static, use high-quality cables and verify proper grounding. Restart the mixer and computer for USB connectivity issues. Adjust gain levels to avoid distortion and ensure all channels are routed correctly. Regularly clean the mixer with a damp cloth to prevent dust buildup. Refer to the manual for detailed troubleshooting steps to resolve these issues efficiently and maintain optimal performance.

Maintenance and Care
Regularly clean the mixer with a soft, damp cloth to remove fingerprints and dust. Avoid harsh chemicals. Use compressed air for tight spaces. Update firmware periodically.
Cleaning the Mixer
To maintain the Yamaha MG12XU’s performance and longevity, regular cleaning is essential. Turn off the mixer and unplug it before cleaning. Use a soft, damp cloth to wipe down the exterior, avoiding harsh chemicals or abrasive materials. For stubborn smudges or fingerprints, a slightly dampened cloth with distilled water is recommended. Gently clean faders, knobs, and other controls with a dry cloth to prevent moisture damage. Compressed air can be used to remove dust from hard-to-reach areas, but avoid spraying liquids directly onto the mixer. Regular cleaning ensures optimal functionality and preserves the mixer’s appearance.
Firmware Updates
Regular firmware updates ensure the Yamaha MG12XU operates at its best. To update, visit Yamaha’s official website and download the latest firmware version. Connect the mixer to your computer via USB and follow the on-screen instructions. Ensure the mixer is powered on and not in use during the update. Do not disconnect the USB cable or turn off the mixer until the process completes. After updating, restart the mixer to apply changes. Always verify the firmware version matches your mixer model to maintain compatibility and performance. Updates may enhance features, fix bugs, or improve overall functionality.

Frequently Asked Questions
- How do I connect microphones to the MG12XU? Use XLR cables and adjust the CHANNEL GAIN knob for optimal signal.
- Can I record via USB? Yes, connect to a computer and use DAW software for recording.
- Why is the PFL light on? Turn off Pre-fader Listen switches after adjusting input levels.
- How to eliminate static? Ensure proper connections, use quality cables, and avoid interference sources.
User Queries
Users often inquire about connecting microphones, optimizing input levels, and resolving common issues. Many ask how to use USB recording, adjust headphone monitoring, and eliminate static. Others seek advice on connecting subwoofers and understanding digital effects. Some users wonder why the PFL light remains on or how to properly set up monitor outputs. Additionally, questions arise about compatibility with larger mixers, integrating external devices, and troubleshooting audio dropouts. These queries highlight the need for clear guidance to maximize the mixer’s functionality and address real-world challenges faced by users.
Expert Tips
For optimal performance, ensure proper gain staging by adjusting input levels to peak just below red. Utilize the built-in effects sparingly to avoid overprocessing. Regularly clean the mixer with a soft cloth to prevent dust buildup. Always update the firmware to access the latest features and improvements. Organize cables neatly to maintain a clutter-free setup. Use the USB interface for high-quality recordings and integrate with DAWs like Cubase AI. Experiment with the digital effects to enhance your sound without compromising quality. Finally, refer to the manual for advanced configurations to unlock the mixer’s full potential and ensure long-term reliability.